Monday, May 25, 2015

Hierapolis – a worthy stop

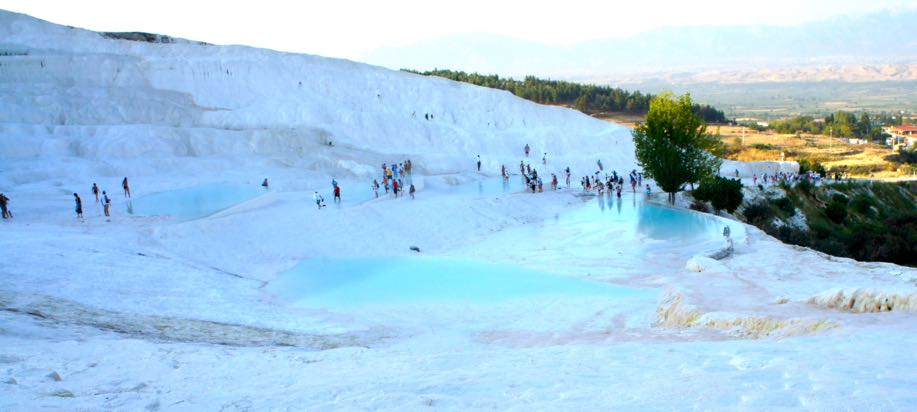
There are very few places in the ancient world, or modern world for that matter, that can claim the same distinctions as Hierapolis. An ancient city sitting high atop the travertine cliffs, overlooking the nearby town of Pamukkale, Hierapolis is a medley of Roman, Byzantine, Christian, Jewish and Pagan influence. Hierapolis is history encapsulated. Built upon a bed of thermal springs that over eons created a doorway of terraced travertine pools, its natural presence is as impressive as the city that once stood there.


For the dedicated explorer of ancient ruins, Hierapolis, A UNESCO World Heritage site, will be a satisfying day of exploration. Although the brilliance of its calcite waterfalls have dulled overtime, and many parts are beginning to display it’s age (about a 1000 years!), the ancient city is a stop you must make on your way to Cappadocia or to Selçuk.


Once an important religious and healing center for the Roman and Byzantine empires, the thermal springs were exploited for it’s healing powers, and it’s religious symbolism. The sick and the infirm came from all over the empire to bathe and even worship at Hierapolis. Rebuilt in 60 AD, the ancient city has gone through a number of changes and ownership over the centuries only to be finally abandoned in 1334 due to an earthquake. For most parts of Hierapolis you’ll need an imagination to discern the ruins, but the structures that do remain are still quite impressive. A huge portion of the city is freely accessible allowing you to explore and get up close. With main streets, corridors, and gates still intact, you’ll get a very good idea of what once went on here.


At the time we visited, cost for both Hierapolis and the Travertine pools was about 20 TL, without in and out privileges. Not a deal breaker by any means as a day is all you really need. If you do get tired, unlike many ruins you’ll come across throughout your travels, you can spend the remainder of the day bathing in their antique pool or wandering through the Archaeological Museum.


What you need to see at Hierapolis:


Roman Theatre


Martyrium of St Philip the Apostle

Agora/Latrine

Roman baths

Necropolis

Hierapolis is one of the main reasons visitors come to Pamukkale. The ancient city does draw a lot of visitors, but being allowed to roam freely and explore at your leisure makes up for the endless crowds. The area that it occupies also does wonders in thinning out the herds.


I know in my previous post I said that Pamukkale is a one-day trip, and that is still true, but if one day were all I had it would be spent exploring Hierapolis.


Hierapolis – a worthy stop

Friday, May 22, 2015

Travel Hack Friday: 27 Things to do With Paracord

Welcome to Another Travel Hacks Friday. As part of a new series, every Friday, we will be introducing new travel hacks for outdoor and urban adventures. We will scour the web for the best and most practical hacks, as well as dig into our reserves and share our own awesome moments of ingenuity!


Paracord is such an amazing and useful piece of gear, that in order to do it justice, I’m going to split this hack into 3 parts.


This is Part 3 of the Paracord series.  If you want to learn more about why paracord is so awesome, and you haven’t yet read part 1:  How to Make a Paracord Belt  and part 2: How to make a Paracord Bracelet


If you’re not yet convinced of the overall cool factor of paracord, and still need a bit of a nudge, I’ve put together a list of the many possible things to do with paracord. The list I’ve put together is not finite, as what you can do with it is limited to your imagination. Its versatility is due to its sheer strength and lightweight nature. Conventional ropes could do the trick, but thin gauge ropes just don’t have the strength, and thick gauge ropes are too damn heavy. Best of all, paracord is low profile and can be worn as a belt, a bracelet, and even a bandolier, saving on precious bag real estate while adding another layer of usability.


Related Posts:How to make a paracord belt

Related Posts: How to make a paracord Bracelet


Remember, it’s one of those things you never know you need until you actually need it. So don’t leave home without it!


So without further adieu, we finally get to the fun part.


27 things to do with Paracord:


  • Replace as shoelaces – Stronger and more durable than conventional shoelaces. Paracord shoelace is a convenient way to carry and use when and if needed

  • Replace a broken zipper pull

  • Use to hold up your pants – read this post on how to make a paracord belt

  • Use as a stylish enviable wrist decoration –read this post on how to make a paracord Bracelet

  • Fishing –separate the internal strands for fishing line.

  • Make a Whip – Indian Jones fans rejoice! The inherent strength and elasticity of paracord surprisingly makes a great whip. Some knowledge of braiding is necessary, but it can be done

  • Make a bola – tie to stones to each end and you have yourself a bonafide bola. You’ll have to teach yourself how to use it though.

  • Make a Lasso

  • Tie, strap, hang or suspend

  • Clothes line

  • Tent lines

  • Hammock lines

  • Safety line to cross rivers and ravines

  • Use as friction saw – This is where paracord shoelaces come in handy. By dragging the cord back and forth you can cut through a number of objects, like zip ties.

  • Sew rips and tears in clothing – separate the internal strands into finer threads for spot fixes like sewing and tears

  • Sew and repair equipment – The internal strands can also be used to repair equipment

  • Towing and pulling - a single strand has 550lbs of tensile strength, doubling you get 1100, tripling 1650 and so on. With enough paracord, you can pull a whole mess of cumbersome things

  • Pull someone up

  • Lower yourself down or climb up – paracord is not climbing rope, but in emergencies it’ll still do the trick. Remember doubling, tripling and so on, can increase that tensile strength.

  • Perimeter trip wire – Tie some pots and pans, or anything that makes a lot of noise, and you got yourself a perimeter security. Lasers not included.

  • Leash for animals

  • Make a snare to trap animals

  • Dental floss –  separate the internal strands to scrap the meat out of them teeth

  • Sling – can be used as support if you’re arms broken

  • Splint – Tie up to sticks to support broken bones

  • Sew up a cut – although not ideal, in survival situations, the internal strands can be used as stitches.

  • Make a tourniquet


Surprisingly for all the uses of paracord, you can get paracord for pretty cheap online.


Here’s where I buy paracord


Amazon.com – you can buy pretty much any denomination of paracord, from 10’ to 1000’ spools.
REI – a little more expensive than the options at Amazon, but you know you’re getting the paracord 550


Hopefully I’ve persuaded you on the importance of having some paracord in your gear sets.  The list above is nowhere near definitive and what you can do with the stuff is truly limited to your ingenuity.


Do you think you have better ideas for paracord?


Travel Hack Friday: 27 Things to do With Paracord

Wednesday, May 20, 2015

Adventure Series: The Two Monkeys Travel Group

I love these guys! Sustainable long-term travel is a tough business. But Jon and Kach of Two Monkeys Travel have devised a formula that makes its seem so darn easy to work and live a life of global travel.  On the road since 2013, the Two Monkeys really put their money where their mouth is. With incredibly detailed, and actionable advice, Jon and Kach inspire others, such as myself, to just get out there and do it. If working abroad and putting some miles on your shoes is your goal, they are the ones to follow. Also, check out their new project #backpackerteacher that promotes travel and volunteer opportunities. These guys are awesome!


Tell me about the Two Monkeys Travel Group.  Who are you, what you’re all about, how long you’ve been on the road, and your first introduction to traveling.


We are Jon and Kach, the long-term travelers behind Two Monkeys Travel. We met on the road and have been travelling for just over two years now. Our aim is to find new and exciting ways to create a sustainable and successful life of travel, while helping and inspiring others who want to do the same. I (Jon) first travelled at a young age in Africa, as my father worked in Kenya and Malawi, so I had a very lucky start. Kach started her first overseas traveling when she finished university and moved to the Middle East to start work, from there she was able to travel to places like Jordan, Kurdistan,


What inspired you to give up a “normal” life and commit to traveling and working abroad as a lifestyle?


I don’t like to think of myself as a ‘classic case of’ anything, but having spent 6 years at university on two different courses and tried two different careers, it was clear that I wasn’t going to find a life that suited me behind a desk, in an office or in any situation that fixed me in one place, despite having a great job in an architects’ practice with amazing employers. In autumn 2011, I went to visit my sister in Barcelona; my first time outside of the UK in four years and it re-lit something in me that had gone dormant for a while – I suddenly remembered how much I loved new places and people, I even missed my flight and stayed for a few more days! It was another 18 months until I made a complete break and flew to Bangkok, but that was the beginning.


The Two Monkeys Travel Group


You guys have been traveling since 2013, and have become some serious experts on working abroad to fund your travels.  What are some of the jobs you’ve done, and which is your favorite?


We’ve done a lot of different jobs along the way, from hostel work, waiting tables, massage therapy and Yoga classes, not to mention the obvious – TEFL teaching. My personal favourite is teaching Yoga. Every yoga class is like a meditation session for me, which combined with guiding a group of students into a completely meditative state and seeing the benefits they feel as they sink into relaxation, gives me a huge sense of calm.


What job or skill would you recommend for someone just starting out on their own long-term travel adventure?


This really depends on the individual, as I would never recommend forcing yourself into something you don’t enjoy. The one-size-fits-all solution is usually TEFL teaching; getting a certificate is quick, painless and relatively cheap, plus it’s useful in most non-English speaking countries. If it doesn’t feel like a passion for you though, I strongly advise taking a good look at everything you enjoy most in your life and trying to find a product or service that can come out of that, otherwise, you’ll forever be bouncing from one job or money making scheme to the next, just like I did back home!


You guys have visited and worked in a crazy number of countries.  Which destination do you suggest is best for someone just starting out, and who wants to work abroad?


Asia is most people’s starting point, particularly for teaching English; living costs are low, demand is high and so are the salaries. We taught in Vietnam and to be honest, life was easy and you could make good money on minimal working hours. TEFL gives you that first step into working abroad. If you want to do the same in somewhere like South America, then it can be a little more challenging, as demand is lower and therefore salaries too. We found that we had to focus more on our massage skills to earn good money in Peru.


The Two Monkeys Travel Group


What are three steadfast rules that you abide by in order to stay on budget while traveling the globe?


  1. We write everything down, every last cent that we spend. That way it’s easy to see where the wastage is.

  2. We separate our money into different envelopes and categories, so we know how much we have for each expense.

  3. We think long term. Day to day thinking burns money. It’s great to be spontaneous but if you want to sustain your travels, or even better earn and save, then you need some kind of plan.

You recently started a project called the #BackpackerTeacher, tell us a bit about it.


It’s a new project that Kach started, with the goal of promoting backpacking and volunteer English teaching around the Philippines. By creating networks of schools and volunteer teachers, we hope to encourage more people to travel, whilst giving back to communities at the same time. We also follow a very strict policy – No one should have to pay to volunteer their time and skills!


How can we get involved?


You can check out our Facebook page and website – http://backpackerteacher.twomonkeystravelgroup.com/ to keep an eye out for projects in your area or an area where you would like to volunteer. We’re still in the final stages of organization, but we hope to announce our first volunteer opportunity very soon!


SustainableTravelLifestyle


How have you guys evolved as travelers from when you started to how you guys are now?


The simplest but most important change has been that now we are traveling with goals and ambitions, unlike when we first left and were simply looking for excitement and new experiences in whatever form they came!


Your one essential piece of travel gear you guys can’t live without?


I’m one of those guys who isn’t completely happy without a knife; just a little one, for cutting pieces of fruit, string, using as a screwdriver or any number of other things. I just like knowing I have some kind of useful tool with me for any situation. I had a great pocket multi tool that my brother gave me, but it was ‘lost’ in customs in Riyadh!


So what’s next for the Two Monkeys? Where will the road take you next?


We’ll be heading north from Costa Rica to Nicaragua in about a month or so, then we’re meeting Kach’s mother in Colombia for her first backpacking trip, before traveling south to Brazil, Argentina and finally, Antarctica!


Do you have any final advice for those who wish to get out and live a life of travel?


Do what you enjoy and don’t fall into the same traps and patterns that you might be trying to leave behind. A job you don’t enjoy is still a job you don’t enjoy when you’re in another country. Aside from that, for a life of travel you need skills that can be used all over the world to provide any type of income


About the Two Monkeys


Kach and JonKach Medina and Jonathan Howe are working-on-the-road couple from the Philippines and UK. Having each decided to quit their jobs and set off around South East Asia to start their new lives, neither imagined they would end up traveling the world with someone they met in a backpackers’ bar in Laos.  But that’s what happened!  They are both certified Tantra Yoga Teachers, Ayurveda Massage Therapists and TEFL Certified Teachers. Working wherever and whenever they want! Travelling since April 2013 and currently exploring South America. their next major travel goal- Antartica via Argentina


Visit their blog twomonkeystravelgroup.com and get to know them on Facebook and Twitter!


Adventure Series: The Two Monkeys Travel Group

Monday, May 18, 2015

One Day is All You Need For Pamukkale

If you haven’t been to Pamukkale, you’re missing out. Located in western Anatolia in the Denizli region, it’s easily one of the most popular and visited places in Turkey. And for good reason too. The white “cotton castle” of hot springs is a stunning series of terraced travertine pools, created by eons of flowing water and is in stark contrast to the regions brown hills that it sits upon. The Travertine pools are also a gateway to the incredible ancient Greco Roman and Byzantine city of Hierapolis. From the pristine Roman Theatre, to the Martyrium of St Philip the Apostle, you’ll conjure images of a time long past. You can’t go to Turkey without going to Pamukkale. For most, going to Pamukkale is a simple bus ride.


Related Posts: Read about our misadventures trying to get to Pamukkale: The Road to Nowhere


pamukkale


But, one day is all you really need.


The Travertine pools and Hierapolis are downright mind-blowing and are awesome in every sense of the word for the adventurer. And beyond the ruins of the city, you can also take a swim in the ancient pools or meander through the archaeological museum. You would also be hard pressed to find an ancient city so conveniently located to town. But the truth is, after one full day wandering through ancient relics and colonnades, there isn’t really much else to do.


pamukkale


For us, this lesson was learned the hard way. Most guides and tour groups will have this figured out, and will allot no more than a day before they move on providing plenty of time to see the Travertines, the ruins, get some swimming in, and of course the quintessential photo op.  We made the mistake of staying three days in Pamukkale, against the advice of one of our companions who left that same day. Even the town of Pamukkale is remarkably unremarkable. Evidently, even with its proximity to two prime attractions, the town of Pamukkale has very little in terms of offerings. Dominated by a disproportionate amount of Pensions serving both food and accommodations, restaurants have given way to the competition and have done little in creating their own memorable dishes, choosing instead to cater more towards group travel. There’s very little in the town worthy of additional time; the town is efficient but short on quality.


pamukkale


The best way to tackle Pamukkale is on the way back from Cappadocia. Either way you’ll have to spend some time on the bus, but going from Istanbul to Cappadocia first will break up the return trip making it more enjoyable. Plus Pamukkale is geographically located in the center of most destinations you’ll end up visiting next. From Istanbul, you can get a ticket at any of the tour offices in Sultanahmet, and from Cappadocia, you can arrange your tickets at any of the shops around the Goreme bus station. Just be certain that your ticket specifies Denizli. Spend no more than a day visiting the ruins and try to get a bus ticket leaving the same day. During high season, buses from Pamukkale will go directly to destinations like Selçuk, but throughout most of the year you’ll have to get a shuttle to Denizli’s otogar (bus station) and then onwards from there. Denizli’s bus station services popular destinations like Selçuk, Izmir, Fethiye and Antalya.


pamukkale


In retrospect, the town wasn’t all bad. We did manage to get some much needed rest,recuperate from the sunburns and blisters, take in the local narghile bars and get ourselves an Efes! But for those with limited time and who plan on seeing as much of Turkey as possible, one day is all you need in Pamukkale.


pamukkale


Related posts: How to Find Adventure in Cappadocia Turkey


Related Posts: The Trouble With Istanbul – 3 Days is Not Enough


Related Posts: The Road to Nowhere: Cappadocia to Pamukkale


One Day is All You Need For Pamukkale

Friday, May 15, 2015

Travel Hack Friday: How to Make a Paracord Bracelet

Welcome to Another Travel Hacks Friday. As part of a new series, every Friday, we will be introducing new travel hacks for outdoor and urban adventures. We will scour the web for the best and most practical hacks, as well as dig into our reserves and share our own awesome moments of ingenuity!


Paracord is such an amazing and useful piece of gear, that in order to do it justice, I’m going to split this hack into 3 parts.


This is Part 2 of the Paracord series.  If you want to learn more about why paracord is so awesome, and you haven’t yet read part 1:  How to Make a Paracord Belt


Last week I showed you guys how to craft a belt using nothing more than paracord and a buckle. This week I’m going to show you all how to make a paracord bracelet to go along with that nifty new belt of yours (you did make the belt right?). Remember, it’s all about accessorizing. If you’re going to do something, do it with style!


There are a lot of instructions that utilize two separate pieces of paracord for the bracelet, but from a usability standpoint, this isn’t the best method. Two separate lines create a weak spot in the paracord and also diminishes the overall useable length.


You can size it for your wrist, but keep in mind the smaller the wrist the less overall paracord length you’ll have at your disposal. For most, 10 feet of paracord will be standard. However, this isn’t set in stone, as there are ways of increasing length while keeping the overall diameter the same. I’ll get to that in a second. It’s better to create the bracelet based on how much cord you want to bring with you as opposed to wrist size. Of course this is within reason. If you plan on bringing 30 ft plus, it makes more sense to consider the paracord belt instead.


Also, generally I do prefer the belt, only because the bracelet just doesn’t have enough length for it to be useful in demanding situations. But this doesn’t mean it doesn’t serve a purpose, as you’ll see in my list of uses for paracord.


There are two methods when making your paracord bracelet.


How to make a Paracord bracelet method 1:


Materials/Equipment


  1. At least 10ft of paracord 550

  2. Buckle or clip

  3. Lighter

how to make a paracord bracelet


For our example we used about 10 feet of cord and made our paracord bracelet for an 8” wrist circumference.


1.Cut a piece of paracord about 10 feet in length and seal off the ends with a lighter


2.Fold the paracord exactly in half, creating a loop on one end


how to make a paracord bracelet


3.Open the buckle and take any of the two sections and run the looped end of the paracord through the buckle,


4.Thread the loose strands through the loop and tighten


how to make a paracord bracelet


5.Wrap the paracord, buckle end, around your wrist to get the size. Preferably, keep it a little loose, because as you create the bracelet, the paracord will tighten


how to make a paracord bracelet


6.Mark the length of the circumference from step 5. This mark will be where you begin tying the bracelet


7.Take the other half of the buckle from step 3, making sure it is positioned properly to lock with the other buckle half, and thread both open strand ends through the buckle until it reaches the mark in step 6. Make sure the length of both ends are still the same.


how to make a paracord bracelet


8.Thread the open strand ends through the first buckle in step 3 again. We sized ours for an 8” wrist circumference, so for a smaller wrist size, you can thread it a 3rd or even 4th time alternating between buckle ends. However, the more you thread, the bigger the buckle you’ll need. For larger wrists, you can skip this step entirely.  Also, if you want to use a longer piece of paracord, and still keep the same circumference, just keep threading it over and over.  Again, you’ll need a larger buckle the more times you thread the paracord.


how to make a paracord bracelet


9.Separate the two open strands of the paracord, with one side to the right (Strand 1), and the other to the left (Strand 2).


how to make a paracord bracelet


10.Now start weaving the ends together. Take strand 1 and bring it under the center loop and cross it over strand 2


how to make a paracord bracelet


11.Take strand 2, and bring it over strand 1 and over the center loop and then through the loop created by strand 1


how to make a paracord bracelet


12.Now pull the ends of both strands to tighten, making sure the knot is below the buckle. It will be a bit off on the first knot, but don’t worry, as you thread it will begin to fall into place


how to make a paracord bracelet


13.Take strand 1 again, which will now be on the left side, and bring it under the center loop and cross it over strand 2 on the right


how to make a paracord bracelet


14.Take strand 2, which will now be on the right side, and bring it over strand 1 and over the center loop and then through the loop created by strand 1


how to make a paracord bracelet


15.Pull both ends of each strand to tighten


how to make a paracord bracelet


16.Rinse and repeat from step 10


how to make a paracord bracelet


17.Weaving will be complete once you’ve either run out of paracord or have reached the other buckle


18.Pull and tighten


20.There are two options to complete the cord 1) stick the excess cord under one of the knots, and seal off with a lighter, 2) tie the excess cord using a simple overhand knot


how to make a paracord bracelet


Voila, you now have a perfect set. If you find you have too much excess paracord, or not enough, go back to step 8 and fiddle with the number of times you thread through the buckles or increase the amount of paracord. It’s always better to have more than not enough.


How to make a paracord bracelet method 2:


Materials/Equipment


  1. At least 10ft of paracord 550

  2. Buckle or clip

  3. Lighter

how to make a paracord bracelet


This method works for greater lengths of paracord. Follow the exact same instructions used to make the paracord belt, but with a smaller buckle suitable for your wrist. But once you begin exceeding lengths of 30 feet or more, it’s probably better just to make the paracord belt.


You can find the instructions here: How to make a Paracord Belt


The most difficult part of the paracord bracelet is getting the perfect size for your wrist. Unfortunately there isn’t a universal rule that can apply to all paracord lengths, sizes and fits that I can think of, but just follow the instructions and do a couple of test runs, and you’ll get it.


Next week we will cover the many uses of paracord!


Travel Hack Friday: How to Make a Paracord Bracelet

Wednesday, May 13, 2015

Adventure Series: Eat Sleep Breathe Travel

Have you met Hannah yet? Cake decorator by day, intrepid adventurer by night, she’s a dedicated female solo traveler who throws caution to the wind. She’s been stalked, chased by whip wielding locals, and was left for dead by Asian tourists! A self-proclaimed travel addict, and lover of ketchup, Hannah will risk it all for that perfect Panda photo op. She has made it her personal mission to travel the world and leave no stone unturned in the process. Follow her and get to know her at Eat Sleep Breathe Travel, I promise you will be entertained…


Tell me us about Eat Sleep Breathe Travel.  Who are you, what are you all about, number of countries you’ve visited, and your first introduction to traveling?


Eat Sleep Breathe Travel started in 2012 as a journal of sorts. It had been nearly a year since my first trip abroad to live in Ireland and travel through Europe. I had all these stories and adventure but no one to tell them too. Like every other travel addict out there, I think we can all agree that non-travel inclined friends just don’t care as much as we want them to. So I created a free blog, wrote about my adventures and hoped that maybe someone would find them and read them.


It was only last April/early May that I decided to take the leap and create Eat Sleep Breathe Travel as a resource and a brand. I was just home from a two month trip in Europe that allowed me to complete and exceed my 25 by 25 goal (27 now) and after so much positive feedback from readers and fellow travelers I decided to take the plunge. Nearly a year later I’m happy to say my website still has plenty of the funny stories and confessions I started with, but also a lot of travel tips, destination advice, and inspiration for other solo and female travelers.


What inspired you to forgo the University Degree unlike so many others, and pursue to live a life of travel? (I love Indiana Jones too!)


INDIANA JONES FANS UNITE! Haha! Honestly, I loved my time at university but as cool as studying psychopaths and serial killers was (my degree is in Criminology) it was never my dream. I tried it, I worked with in the victim’s field for a little over two years, but I wear my heart on my sleeve and dealing with those stories in real life isn’t quite as bad** as it seems on T.V. Basically, I burnt out. In fairness, it’s never what I really wanted anyway. I gave it a shot, it was good while it lasted and I loved that I did make a difference, but I can pretty much guarantee I’ll never go back.


So you’ve left the regular 9-5 grind, how do you fund your yearly adventures?


I did a complete 360 and put aside the text books and literature to embrace my creative side. For the past three years I’ve worked as a professional cake decorator in a specialty shop here in Ottawa (my hometown). Not only is it fun, but it’s pretty flexible in allowing me to travel, even for a couple months at a time.


I’ve also been working on my freelance portfolio. I’ve always wanted to write and pairing that with my passion for travel is the ultimate goal right now. It’s a lot of work, and definitely not easy but I’m stubborn and will keep at it in the hopes that it pans out for me in the long run. Wish me luck!


Carrick-a-rede bridge (1 of 1)


What was the most creative or weird thing you had to do for some travel money?


I ate a packet of ketchup at a pub in Ireland for about $10 Canadian. It was a dare from a group from Northern Ireland, and they were both amazed and disgusted that I did it. One of them even took a video. I have no idea why they were so grossed out. I love ketchup so it didn’t bother me in the least, and talk about easy money!


There are a lot of scary stories about females traveling solo.  Are these warranted, and what motivated you to give solo travel a shot?


I do think that caution is warranted, but I don’t think that travel as a solo female is as dangerous as everyone makes it out to be. I’ve been in a couple scary situations while travelling solo, but nothing that couldn’t happen to me here in Canada either. The good situations; the kindness of people I’ve met along the way, and the friends I’ve made, those far outweigh any negatives. I started travelling solo because I didn’t have anyone to go with, but with so many positive experiences, I now prefer it.


I can imagine solo female travel can put you in some dangerous situations.   What is one of the most intense situations you’ve ever gotten yourself in to and how did you get yourself out of it?


As mentioned above I’ve had a couple sketchy incidents, bar far the scariest was in 2011 in Belfast. I was out at the pub with a group of Scottish guys from my hostel who were in town for a work party. I spent most of the evening dancing and talking to the younger ones who were my age but when I left, their boss (probably twice my age) followed me back. He was drunk and incredibly inappropriate; he wouldn’t stop grabbing at me. For a little while I was actually afraid that he would try to sexually assault me. I ended up being able to get far ahead of him, but of course we were staying in the same hostel. Thankfully I was in a female only dorm which I had to myself. I actually barricaded myself in my room that night. Nothing happened- he passed out downstairs on the table, but thankfully they had to leave really early and I didn’t have to see him again.


Hostel Friends (1 of 1)


Traveling solo for some people can be really intimidating, especially for those who are shy.  How do you go about breaking the ice, and make meaningful connections with others?


I am super outgoing and social. I have no problem plunking down at a table in a hostel and introducing myself, or joining in a conversation I hear and can participate in. One of my favourite go-to’s when I get somewhere new is to ask for advice on the area, it’s an easy way to start up a conversation. And, if I’m going out in search of dinner I’ll always ask my roommates, or whoever I’m with in the common room, if they want to come with me. In my experience, grabbing a meal with someone is one of the easiest ways to make friends.


If you could offer only one survival/safety tip for female solo travelers, what would it be?


It sounds cliché but women seriously have some type of inner alarm. I had a bad feeling when the guy in Belfast picked up his coat and walked over to me as I was saying goodbye. I should have asked one of the others to walk me back, or ducked out sooner. Women need to trust their intuition and, not be afraid to ask for help. Although there are a few jerks out there, everyone has wives, daughters, mothers, sisters and girlfriends too- no one likes to see a girl scared and I’ve discovered many times that people are quick and willing, to help.


I know you have a lot more adventuring left to do, but up until now, what is the most memorable experience/trip?


My first ever trip in 2011, when I lived in Ireland and travelled around Europe, will probably always be my most memorable. It sounds cliché but I learned a lot about myself; I was capable of taking care of myself and being independent. I made a lot of mistakes, missed planes and took the wrong trains, but it made me realized how strong I was and it made me braver. The coolest experience I had during that trip was just outside of Salzburg, when I inadvertently took part in an Austrian Christmas tradition telling the story of Krampus, a Christmas demon. I was the only foreigner there and quickly became targeted by the locals dressed as Krampus who chased me with their thick whips while I tried to take their picture. It was a bit startling because I had no idea what was going on, but I laughed the whole time. It was definitely a once in a lifetime experience that I was lucky to have stumbled into.


krampus (1 of 1)


Your one essential piece of travel gear you can’t live without?


That’s a massive toss-up between a journal and my camera. I guess if I had to pick, it would be a journal. I write in them religiously after every day while I’m travelling so later down the line I can look back and remember it all, it helps for my writing too. I also love the idea of being able to pass them on down the line, so when I’m old and senile my grandchildren (assuming I have a family) can know I was kind of a cool person.


You’re obviously no longer a “travel virgin”.  So, how have you evolved as a traveler from when you first started to how you are now?


I have learned a lot of things since I took my first trip from budgeting to something as silly as how to read a map. I really was completely clueless when I started. One of the biggest things I learned was what actually counts as a cheap flight. Being from Canada, flights are ridiculously expensive. So when I saw a roundtrip fare from Ireland to Scotland for $350CDN I jumped on it. HUGE mistake, I should have paid max a third of that. I spent a lot of unnecessary money those three months in Europe, just from not knowing any better.


I’ve also learned to slow down a bit. One of my travel friends told me I suffer from FOMO (Fear Of Missing Out) and he’s right. I tend to be somewhere new every couple of days; I want to see it all! Last year I spent an entire week in Nice and just did a few day trips, it was actually really nice to take it easy for a few days so I think I learned a bit from that and will slow down in the future. At least a little bit, but no promises!


Do you have any final advice for women who plan on solo female travel like yourself?


I think the hardest thing being a solo female traveller is the negativity attached with it. So many people warn me against going everywhere I look at, whether it’s for culture differences, stereotypes, or a variety of silly reasons. It’s amazing how many people think they know best just from reading a story in the news, when they have little or no actual travel experience to fall back on. My biggest piece of advice would be to block those people out and do your own research. You know your comfort levels and if you feel safe and ready to go- do it. Don’t let anyone tell you where you should and shouldn’t go.


Hannah in Piran, Slovenia


Where will the road take you next?


Well isn’t that the million dollar question! I will be back in Ireland (where it all started!) in September; my old roommate is getting married so that will be one hell of a party. As for the rest… I’m not quite ready to share those plans as they are still in the works. What I will point out is that it has now been a year since I’ve been outside of North America, the longest stretch yet, so you can bet I’ve been saving for something…. Stay tuned!


About Hannah Logan


Eat Sleep Breathe TravelHi! I’m Hannah, a Canadian travel addict who has been dreaming of adventure since I first watched Indiana Jones. Travelling on and off since 2011, I’m on a mission to see the world. Will you join my (mis)adventures?


Hannah blogs over at Eat, Sleep, Breathe Travel.  You can follow her adventures on Facebook, Twitter and even on Instagram!


Adventure Series: Eat Sleep Breathe Travel

Monday, May 11, 2015

The Road to Nowhere - Cappadocia to Pamukkale

I couldn’t remember where I was.


Through the haze of deep sleep, I could hear the footsteps crunching on the cheap vinyl carpet. Somehow, through the fog, I knew those steps were coming for me. The bus lurched. The breaks squealed as they forced the bus to a painful stop. Was I in the right place? Did I somehow turn left instead of turning right? Maybe, perhaps maybe, I had gotten on the wrong bus. The events of the day unfolded quickly in my mind; about 7 hours ago my wife and I boarded a night bus from Cappadocia bound for Pamukkale. I was certain I confirmed with the ticket agent; double and even triple checked the number. No, I didn’t make a mistake.


I struggled to make sense of my surroundings, but the dim cabin lights magnified my displacement. Looking around at the other passengers, mostly locals, I could swear they were consciously avoiding eye contact. I had a feeling, they’ve been down this road before and that wherever we were, it was a place they certainly did not want to be. As I peered out the window, greeted by my own reflection, I could see only darkness. This sure as hell wasn’t the Travertine pools nor was it Denizli.


The Galley Master, looking convincingly like a bus attendant, addressed us in English laden with a thick Turkish accent, “Here, here.” Whipping us into line like sheep to the slaughter, he forcefully ushered us out the now open back door.  There were four of us in total: me, my wife, and two other women. Within moments, before we could realize what was happening, we were standing alongside the bus, watching the driver grab our packs and toss them haphazardly unto the roadside, all while ignoring our silent protestations.


I grabbed the Galley Master’s arm as he turned to walk away, hoping to force a conversation or the very least an explanation. With a surprising deftness, probably honed from previous victims, and in one well-rehearsed movement, he shrugged off my hand, jumped on the already moving bus, turned and said, “Here, wait here.”


“Wait here? There’s nothing here,” I responded to no avail.


As we watched the bus roll away in the darkness the four of us shared a glance. Words were unnecessary at this point, but we knew what we were all thinking, “what the fuck just happened?”


We were in an empty lot, surrounded by trees on all sides. Besides the few crude wooden benches dotting the edges and a couple of randomly placed street lamps, the lot was unremarkable. About 100 feet away, a group of Turkish men stared at us with a mild curiosity. Periodically they would take drags off their cigarettes to remind us of their indifference.


We were in the middle of nowhere.


I’ve been stranded before. Being a seasoned backpacker, this certainly wasn’t my first rodeo. I’ve hitchhiked, I’ve trekked, and I had no reservations about asking help from strangers. But this time it was different.


I could hear the disembodied growls all around us. It happened fast.  Within heartbeats, the shadows came alive with a pack of rabid wild dogs. Like predators sensing weakness, the dogs circled, jostling and pacing for a better attack position. With little effort, I instantly spotted the Alpha; a big muscular hellhound, with glistening yellow teeth, whipping saliva with each bellow. This was no ordinary run in with strays. Instantly we went on the defense. The women formed a tight defensive circle, stepping as high on the benches as was possible; I grabbed my bag, holding it in front of me as a shield. The pack continued to circle, brandishing their teeth, howling intermittently as though calling for action. I bluff charged, I yelled, but this only served to aggravate them more. We braced ourselves, as the attack seemed imminent.


Suddenly, we could hear loud whistling, followed by even louder yelling. From behind us, the three Turkish men dropped their indifference and charged, attacking with rocks and cigarette butts. The dogs attempted to mount an offensive. But in the face of greater aggression, the pack scattered running back into the shadows from whence they came. Clearly, these men have dealt with their kind before.


Perhaps we were meant to wait for another bus, or perhaps we really were left stranded. Looking back, it no longer really mattered. What was expected to be an uneventful bus trip from Cappadocia to Pamukkale became one of our fondest memories. In the end, the three men not only pulled us from the fire, but also helped us arrange a ride to take us the final few hours to Pamukkale. For my wife and I, this was the reason we traveled. In the place we least expected, we were given a peek behind the curtains and experienced the genuine kindness and generosity of the Turkish People.


If this was nowhere, I’ll take that over somewhere any day.


The Road to Nowhere - Cappadocia to Pamukkale

Friday, May 8, 2015

Travel Hack Friday: How to Make a Paracord Belt

Welcome to Another Travel Hacks Friday. As part of a new series, every Friday, we will be introducing new travel hacks for outdoor and urban adventures. We will scour the web for the best and most practical hacks, as well as dig into our reserves and share our own awesome moments of ingenuity!


Paracord is such an amazing and useful piece of gear, that in order to do it justice, I’m going to split this hack into 3 parts.


For those who’ve ever needed to hang a bear bag, or rig a safety line, you know dental floss just isn’t going to cut it. Rope, or some form of it, is an underrated item often overlooked by travelers aiming to be lean and mean! Unfortunately it’s also one of those items we never realize we need, until we need it.


I don’t blame you though, if my choice were between carrying a backpack or 50lbs of rope, the backpacks going to win out every time. For the ultimate outdoor survivalist, you could learn to make rope out of plant fibers, but this is time consuming, and in most cases a last resort.


A better, and far easier, solution would be to go and get you some paracord.


I’m talking about lightweight, high tensile strength paracord, also called parachute cord, utility cord or 550 cord. The same type of cord used to suspend parachutes. Paracords have been used amongst the military for some time now, and is fast becoming standard issue amongst campers and outdoor survivalist for its strength and versatility. Even for backpackers and casual travelers paracord has a plethora of uses and not just for survival situations.


A kernmantle rope made of braided Nylon or Polyester sheathing, and a high number of interwoven strands within (also known as the “guts”) paracords are strong, small and super lightweight. The cord inherently has a high-tensile strength of 550lbs (hence the name). The polyester versions are essentially the same, and sometimes have an even higher tensile strength.


paracord belt


Like conventional ropes, paracords can secure, lash, pull, lift, and strap, but unlike standard ropes, paracords can be further stripped down and its fibers inside be further used for gear repairs, fishing lines and yes, even dental floss.


Best of all, paracord can be styled into wearable accessories like belts or bracelets, so you needn’t sacrifice precious bag real estate. Seriously, your friends will be green with envy.


For the first part of this weeks hack, I’m going to show you how to make a paracord belt.


How to make a Paracord Belt


Materials/Equipment


  1. Buckle

  2. Paracord 550 (length will depend on waist size. I recommend 50ft minimum)

  3. Lighter, scissors

paracord belt


We opted for the buckle whistle from REI, but there are a variety of buckles available depending on personal preference. Also, the length of paracord needed will depend on your waist size. To give you an idea, for every 1 foot of paracord, you’ll get approximately 0.64 inches.


1. Cut to length and seal the cut end(s) of the paracord by burning with a lighter to stop the fraying


2. From left to right, thread the paracord through the buckle creating 4 loops going under over and fasten the end of the cord to the buckle to keep it from unraveling


paracord belt


3. Form a loop with the trailing end and thread it through the 4 loops from step 1, leaving a couple edges hanging off the right end


4. Tighten the 4 loops from right to left


paracord belt


5. Slightly spread apart the 4 tighten loops just enough to pull out the tail end of the cord you thread through in step 3 to form 4 more loops


paracord belt


6. Turn the loops counterclockwise so the left of the loop is facing you


paracord belt


7. Form a loop with the trailing end again and thread through the 4 new loops, leaving a couple inches hanging off the right end like step 3


8. Tighten from right to left again, pulling on the loop hanging off the right end to tighten the last loop on the left (if your loop on the right becomes too long, just pull on the trail end of the paracord to the desired size)


paracord belt


9. Rinse and Repeat until you get to your desired belt length.


10.Once you’ve reached your desired length, grab the buckle end (make sure it’s facing the right way so it can clip to the other side)


paracord belt


11. Pull the hoop hanging off on the right, until the trailing end comes through all the way through


paracord belt


12. Slightly spread apart the 4 loops


paracord belt


13. Loop the trailing end of the paracord to the buckle end, over under


paracord belt


14. Thread the trailing end through the first loop on the right and then back over through the buckle


paracord belt


15. Repeat until threaded through all 4 loops,


paracord belt


16. Tie off the end in a simple knot.  Alternatively, you can thread it through anywhere in the belt, cut the excess and seal the frayed end with a lighter.


17. Now admire your new Fashion Accessory – The Paracord Belt!


paracord belt


If you want to increase the length of cord used to make your paracord belt, or need a larger, or even smaller waist size, you can change the number of loops per row.  So instead of using 4 loops like this tutorial,  3 loops would make the belt longer and thinner, whereas 5 loops will make the belt shorter and wider.


Lastly, to unwind, simply undo the buckle end you just completed, and pull the trailing end back through the loops to the left, and pull. That’s it.


Read my post next week to learn how to craft a Paracord Bracelet.


paracord belt


Travel Hack Friday: How to Make a Paracord Belt