Being lifelong travelers, we all love our lightweight, multipurpose gear that can withstand the rigors of the road. Gear should be dependable, multifunctional, durable and perform beyond expectations. Nothing could be truer when it comes to buying a good hiking backpack, especially considering it’s going to be your home away from home. Traveling, especially long-term, will literally test the limits of your bag and your body, and as such this decision should never be made impulsively. Buying your backpack should not be a rushed decision and factors like trip length, capacity, material, functionally and comfort should always be considered. When I first got serious about investing in a good pack, I was at REI for a good 3 hours –I think they started to suspect I was applying for a job.
If my three hours was any indication, buying a good backpack is not an easy task. With hundreds of backpack manufacturers and styles, it can understandably be overwhelming. Whatever you do, don’t go cheap. You’ll be doing yourself a disservice and end up buying a new one anyways. A good backpack is an investment. You needn’t spend $500 on a backpack, but be wary of cheap, no-frills, run of the mill $70 brands, as you’ll regret the design flaws and absence of extras. Spend a little more for a good backpack from a trusted brand, and it will be your companion for many trips to come. The Osprey pack I eventually settled on has traveled with me from the U.S to the Middle East for 10 awesome years and I know it has another good 10 years to go.
Travel Backpack or Hiking Backpack
Before you begin shopping for the right pack, it’s important to know the difference between travel backpacks and hiking backpacks. A travel backpack is a backpack-suitcase hybrid with a zippered side panel similar to a suitcase. Hiking backpacks are the more commonly seen cylindrical top loading packs with straps, clips and a top lid. Some people have an opinion that hiking backpacks are only suited for the backcountry and has no place for the backpacker, I disagree. What works for you ultimately comes down to personal preference and style of travel. Travel backpacks are great for easy, organized access to gear and transporting from hostel to hostel. They also function well for short walks or even as a daypack.
On the other hand, if you possibly have camping or long treks in your travel plans, you may want to consider a hiking backpack. Hiking backpacks are designed for comfort, proper weight distribution, and toughness. Unlike a travel backpack, hiking backpacks will have enhancements like full-sized hip belts, shoulder and back suspension systems along with plenty of load bearing straps to mitigate discomfort. Granted the top down packing isn’t as convenient to access your gear, but that’s part in parcel to proper weight distribution. A good compromise would be to get a hiking backpack with side load access.
I am generalizing a bit as they do have travel backpacks that are in the upper capacity range with more advanced suspension systems, but if you’re going to get a 70L travel backpack, you may as well go with a hiking backpack. Trust me, you’ll be glad you did for that unexpected 20 mile trek to the next town.
Personal Backpacking Style
Next, determine the style of travel you normally like to do. Unless you’re willing to buy a different backpack for each trip, figuring out your travel style will save you a lot of money in the long run and give you a piece of foundation gear that’s ready for any trip. For instance, if you generally go on week long trips you needn’t get a high capacity bag and could probably get away with a 35 liter to 50 liter (L) pack, whereas living long-term on the road may require 65L or greater.
Size is pretty subjective though and shouldn’t be the only determining factor. Some people are able to pack very bare bones, where others require a bit more. Consider these factors:
How long is your trip:
Depending on the length of your trip the capacity and overall weight of your pack will vary. Short trips require less capacity, and long trips typically require more. But be aware that the bigger the pack the heavier it will become. 50lbs may not seem a lot at first, but 2 months in and it will feel like a ton of bricks.
What Type of Activities will you do:
I personally feel that one bag can rule them all since I generally use my pack for everything. However, this may not be the case for everyone. Knowing what type of activity you’ll be doing will help you zero in on that perfect backpack. If you’re not planning on carrying it around much, consider a travel backpack or even a wheeled backpack, whereas if you foresee yourself doing long treks then a hiking backpack may be more suitable. I like to be prepared for any type of spontaneous activity, so I lean more towards hiking backpacks. Also, hiking backpacks are generally made a bit tougher, so keep in mind that the more challenging the activity, the greater the stress on the bag.
Lightweight or the kitchen sink:
Although I mentioned earlier that size is not the main determining factor, it’s still important to consider capacity based on what you plan to bring. If ultra light is your goal, avoid high capacity backpacks as you’ll invariably bring too much or if you do manage to pack light your backpack won’t distribute the weight properly. Conversely, if your backpack is too small, you won’t be able to fit everything in. Have an idea of the gear you’re bringing and pick the capacity of your bag accordingly. Don’t hesitate to bring your items to the store to see how it fits in the packs. A reputable retailer, like REI, won’t have a problem with this.
What To Look For In A Hiking Backpack
Backpacks vary in functionality as much as they do in appearance, with the more expensive models having the most bells and whistles. As with everything, your decision here is closely related to what type of traveling you like to do.
Water Resistant
Your pack is probably not going to be completely waterproof. Meaning, if submerged, or in a torrential downpour your clothing and equipment will still get wet. Although most backpacks now come with a rain cover, you still want it to be made of a tough, rip proof, and lightweight silicone coated nylon or Cordura type material that allows rain or water to bead off and not soak through.
Detachable Daypack
this option is really a personal preference, and not really a deal breaker, as many travelers bring an additional pack for day trips. But for those focused on traveling light, carrying two bags can be cumbersome. I personally like the option of a detachable daypack as I have it only when I need it. On my Osprey, the top lid doubles as a daypack. Not as comfortable as a dedicated daypack, but it serves its purpose.
Heavy-duty Lockable Zippers
A chain is only as strong as its weakest link. No matter how good the material of the backpack, if the attachment points, like zippers, are weak the whole bag is worthless. Make sure the zippers are tough and lockable where applicable.
Pockets and Compartments
The more compartments the better. Good backpacks usually have a number of compartments to help store and separate your gear so you won’t have to sift through layers of clothes just to find your chapstick. For instance, maps can go in the top flap, while your flip-flops are stored conveniently in the side pocket. However you decide to pack, separate pockets allow easy and quick access to your gear. Most backpacks will also have strategically placed pockets, like on the hipbelt, so you can get to your gear without having to drop your pack.
Lightweight Internal Frame
Backpacks generally come with an internal frame, external frame, or no frame at all. I strongly recommend a lightweight internal frame made from strong carbon fiber rods. This provides more load support and just looks better. External frames are bulky, conspicuous, and use dated technology and frameless backpacks have awful load support at higher weights. Trust me, without proper weight distribution, you’re shoulders are going to feel every single one of those pounds.
Side Load Access
I’m seeing less and less of this function on the newer backpacks, but if you do happen to find one with side access you’re golden. You’ll be able to access items from the main compartment of the bag without digging in from the top. You’re life will just be that much simpler.
Suspension System with Padded Shoulders and Load Bearing Straps
Don’t even consider buying a backpack unless it has either an adjustable or fixed suspension system, along with a bunch of load bearing straps. The suspension system is the part that usually rests against your back and where the padded shoulders connect. Fixed system means that it fits to one torso size, whereas the adjustable system can be calibrated. The whole system is meant to help stabilize load and transfer weight to your hips. The load bearing straps, like the sternum strap, will also help move the weight around minimizing pain and discomfort.
Ventilation
To minimize the discomfort from an annoying sweaty back, get a backpack with ventilation. Most internal-frame packs will have some sort of ventilation system or design feature that promotes airflow, creating a permanent breathable layer between yourself and the backpack. Although not essential for load support, it certainly increases your comfort level.
Padded Full-size Hip belt
This is probably the most important feature of any backpack since your hips will be carrying 80% of your backpacks weight. The padding in the belt will help you avoid fatigue, discomfort, and of course load distribution. Make sure you get one that’s full-size, where the padding comes around your hip bone to the front, and isn’t just a thin strap with a clip.
Multiple Straps and Tool Attachment Points
This feature is a personal preference and doesn’t really impact comfort and load distribution but I do feel it’s just as important. I like the idea of having excess straps, clips and tool attachment points. You’re able to perform on-the-fly spot fixes for a variety of unexpected circumstances, making your backpack function more than just as a bag. You’re able to tie, hook, and rig a whole mess of things while on the road without having to carry additional gear. Some backpacks have begun to include “daisy chains” (typically found on climbing packs) which is a series of tool attachment loops.
Internal Hydration Reservoir
An internal compartment that holds your favorite hydration bladder (i.e. Camelpak, Platypus) so you have hands free access to H2O. Openings on the backpack will allow you access to the sip tube making it a very practical feature during your long treks. You won’t have to dig into your pack or stop your momentum looking for your water bottle.
What size backpack do I need
There’s no definitive rule for this question, as it completely depends on your own travel style, trip duration and weather. Generally, the colder the weather the greater the capacity needed; the greater the capacity the greater the overall weight. I try to pack light and bring only what fits in the backpack. So the best advice is to find a bag capacity you’re comfortable with, and pack in only what you absolutely need and what fits. I’ve provided a very broad guideline below:
[table id=10 /]
How to find the right fit
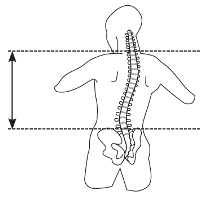 Image from Gregory Packs
For the best comfort and proper load distribution you need to make sure your backpack fits correctly. Ideally, you should try it before you buy it, but that’s not always an option. To find the correct fit you’ll need to find your torso length, not your height, which is the distance, in inches, between your 7th cervical vertebra, and your iliac crest. In other words, from the base of the neck to the top of your hip bones. Once you have this measurement, use this guide:
[table id=11 /]
As for your waist size, most backpacks have adjustable hip belts so finding your precise hip size is not as important as determining your torso length. Just make sure the belt sits on top of your hips, with about an inch above and below the belly button.
How much should I spend on a Hiking backpack
You’ll find backpacks ranging from under $100 to as high as $600. Unless you have an unlimited budget and want the latest model just because, it isn’t necessary to spend more than $300. With that being said, I would also stay away from anything under $150 as they will be lacking on essential features like a suspension system or a padded hip belt. Buying a backpack is an investment, and the last thing you want is for the seams to rip or a shoulder strap to tear off when you need it most. Just make sure your backpack has, at a minimum, the above features and fits comfortably.
The Best Backpack Brands
There are hundreds of great brands out there with an equally daunting number of styles and models. I’m not really the authority on which brand is better than the next. I can only tell you the brands I prefer and those whose quality I have confidence in. I’ve been using the same Osprey backpack since 2004, and my wife has been using a Gregory for nearly as long. I can honestly say, that after relentless airline abuse, backcountry trips, and overseas adventures, not a single strap, zipper or clip has ever needed replacement. Worth mentioning as well, Osprey and Gregory offer lifetime warranties on all their bags. You’ll probably never need it, but it’s great to know that the company stands behind their products.
Osprey
With 40 years experience manufacturing backpacks, and a lifetime warranty, Osprey exudes quality. They have one of the largest selections of styles and sizes for all sorts of adventuring, and their packs sport the latest backpacking technology. Osprey is my personal favorite and go to brand of choice; you really can’t go wrong with these guys.
Gregory
Like Osprey, these guys specialize in backpacks. My wife will attest to their quality and comfort. She has used her backpack for close to 10 years without a need to ever repair or replace. Gregory also stands behind their products with a lifetime warranty.
The North Face
Originating in San Francisco, The North Face has been developing adventure gear for over 40 years. I’ve never had the pleasure of using their backpacks, but with their pedigree and lifetime warranty, I would feel confidant carrying their packs any day of the week.
Arc’teryx
Along with having a really cool name, Arc’teryx pumps out some pretty awesome products. They are one of the more expensive brands out there, but if you’re willing to pay the price, you’ll most certainly get the quality
Deuter
A low to mid range brand, Deuter is a solid choice if you want function for a reasonable price. They’ve been in the backpacking game since 1968 and are very popular amongst Europeans.
Backpack Accessories
Rain Cover (separate or built in)
Most backpacks are water resistant but not waterproof, making them susceptible to persistent rain exposure. It’s a worthwhile addition if your backpack doesn’t already come with a built in rain cover. You needn’t get a fancy one or spend a lot of money, just make sure it fits your pack size. I use the REI Ducks Back Rain Cover, and it works perfectly fine.
Airporter Bag
The last thing you want is to have your backpack damaged before you even start your trip. With all the straps, exposed shoulder, and hipbelt, it’s easy for something to get caught and tear right off. An Airporter bag will cover your entire backpack (think bag within a bag) and protect it during transport. As well, you can put a lock on the lockable zippers as an extra layer of theft deterrence. I have the Osprey Airporter LZ. I wish it was lighter (weighs about 1lb) but I suppose it’s worth it for the extra peace of mind.
Well, there you have it, my “how to buy an awesome hiking backpack” guide.
What are some of your favorite backpacks and why? Please feel free share your own experiences below.
How to Buy an Awesome Hiking Backpack